Bicycle upgrades. Replacing Shimano Hollowtech II bottom bracket and cranks
| Channel | Publish Date | Thumbnail & View Count | Download Video |
|---|---|---|---|
 | Publish Date not found | 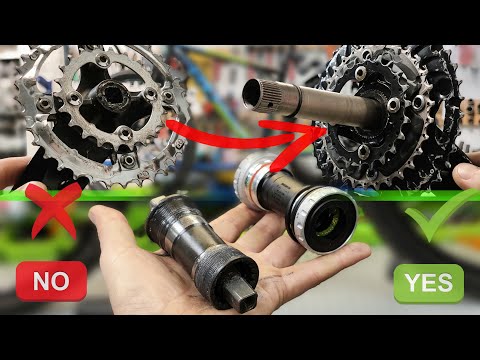 0 Views |
Hello cyclists!
Bike upgrades. DIY with ASRM
Turn on the subtitles, sit back and let's get started.
In this video tutorial I will show you how to replace a Shimano Hollowtech II bottom bracket and cranks. How to remove bicycle cranks.
Don't forget to lubricate the disassembly tool, all threaded connections must be lubricated. This will make your equipment last longer and disassembly of the assembly easier and faster.
Follow our example and you will be able to replace the cranks on a bicycle without any problem. Now let's compare the weight difference between old and new bicycle cranks. The difference is insignificant, but it is due to the weight.
How to remove a bicycle bottom bracket. The old bottom bracket under the square is heavier. Therefore, when using Hollowtech II, the entire rod system is lighter. In the workshop I use long levers, large tubes so that you can unwind each part. Come to our playlist, you will find many videos on how the transmission works. The old bottom bracket was dirty. All the dirt that flies into the frame falls on the bottom bracket. Then everything creaks and squeaks. New bottom bracket. Shimano Hollowtech II bottom bracket sm-bb52 out of the box. The manufacturer puts a lot of grease in the bottom bracket. This grease can be used to lubricate threaded connections.
Spacers, a very important detail. I will show you clearly how to choose RINGS individually for your sled knot without instructions. First we weigh our new Hollowtech II bottom bracket. The old bottom bracket for the square bottom bracket and the new bottom bracket, as you can see the difference is significant. Our bottom bracket is 68 – 73 mm. The frame is 73 mm wide at the bottom bracket shell. Spacers allow you to adjust the width of the bottom bracket. Pay attention to the spacer selection. Depending on the cut, Dobby lenses can be completely different.
This is the universal method to choose the right spacers. Replace the bottom bracket. Lubricate the threaded connections well. The lubricant will repel water and your slide will last much longer. Subscribe and like the channel) Replacing bicycle cranks. If you don't lubricate the splined shafts and they need to be lubricated, your cranks will creak and make an unpleasant creaking sound.
The left crank has a special pin. This must be lifted. It must be tightened so that the rod does not dangle and does not have to be pulled. The force should be moderate. Left connecting rod: It is important to tighten it properly with a force of 12 or 14 Newtons per meter.
The rest of the knots in this video are tightened by hand, based on my experience. But this knot must be tightened in a criss-cross pattern, following the rules, with the bolts tightened one at a time. That's it! Our bikes are ready.
00:00 DIY bike upgrades
00:23 How to replace a Shimano Hollowtech II bottom bracket and crankset
00:35 How to remove bicycle cranks
02:30 How to remove a bicycle bottom bracket
04:34 Shimano Hollowtech II bottom bracket SM-BB52 – Unpacking
06:53 Changing the bottom bracket
09:04 Replacing bicycle cranks
#cranks #bicycle #bicyclerepair
*Write in the comments what I should do in the new video.*
*Ask your questions in the comments*
Please take the opportunity to connect with your friends and family and share this video with them if you find it useful.